
The most important fact to remember is that Beanie models are a special type of Pydantic model that has been customised to play nice with MongoDB. Your FastAPI server will work with Pydantic except when sending data to Mongo. So we will import both modules. Create a file inside the models directory and name it user_models.py with the following imports:
1
2
3
4
5
from beanie import Document, Link
from pydantic import BaseModel, EmailStr

from datetime import datetime
from typing import Optional
The first model we will create in this file is the “shape” of the document that will be present in MongoDB. Remember that a document in Mongo is not fixed in stone, you can add fields later and omit values for certain fields. But it helps to consider all the basic functionality you will need before you start saving data, so that you can work with it properly.
The Beanie User Model
1
2
3
4
5
6
7
8
9
10
11
12
13
14
class UserMongoDB(Document):
    """User database representation"""
    first_name: Optional[str]
    last_name: Optional[str]
    plants: list[Link[PlantMongoDB]] = []
    avatar: Optional[dict]
    created_at: Optional[datetime] = datetime.now()
    disabled: bool = False
    email: EmailStr
    username: str
    password_hash: str

    class Settings:
        name = "Users"
What is going on by line number?
(1) The “Document” inside the parentheses means that the class you have created inherits all the functionality of a Beanie model (which is the functionality you want to use to interact with MongoDB). Additionally, behind the scenes, that Beanie model also inherits Pydantic features. Think of Pydantic as the Grandmother of Models, Beanie as the Mother of Models, and your named model as the child with the genes of the grandmother and mother, plus your own unique ones. I have named the class with MongoDB in it’s name to differentiate it from the other Pydantic classes.
Don’t forget your doc strings (2) which will appear as type hints in some tools and some auto documentation.
Line (5) needs further explanation, as it can be the cause for trouble if misunderstood, so I will expand further on.
(7) Two separate imports at the top of this file help us work with the model and they should be self evident: “Optional[]” and “datetime”. If you are planning ahead, then you can anticipate that a field like “created_at” would be useful if in the future you want an option to say “Member since …”
In the case of lines 9-11, every user should have at a minimum an email, a username and a password_hash.
(9) You’ll notice that “EmailStr” is imported from Pydantic, it nevertheless can be used here (a Beanie model) because of the inheritance pattern I discussed above. This is simply used to verify that the user has typed something that looks like an email and not just any random text.
(10) you might notice that “username” is not in the pythonic snake case. This is on purpose and necessary for implementing authorization later on, as it conforms to the industry standard method we will be using.
(11) Although you will be requesting your users to type in their password, you will not be saving that, but instead a secure and undecipherable “hash”, which can then be used for authentication.
Beanie models can take a number of settings. This is done by adding an internal class as seen on line (13). In this case the only setting we are using is “name” which refers to the name of the “collection” in MongoDB. Every user will be stored in the collection “Users”.
Two Collections or One or why line (5) seems more complicated.
There are certain considerations of speed and size that are made when designing a database at enterprise level. For our small simple app, the consideration that we should be more concerned with is how the data is used and presented to the front-end of our app.
For this app we have two options:
Option 1: One Collection.
One collection for users, where we each user has all the data we labeled in the model above, plus all her plants embedded as part of her data. If you were to see a JSON representation of an example it woul look like this:
1
2
3
4
5
6
7
8
9
10
11
12
13
14
15
16
{
  _id: "644135dfbe2b4049b26a46e3";
  first_name: Michelle;
  last_name: Obama;
  plants: [
    { name: "Monstera Deliciosa", date_of_purchase: "2023-05-05" },
    { name: "Alocasia Zebrina", date_of_purchase: "2023-05-05" },
  ];
  avatar: { url: "http://www.cloudinary.someurl.com/image",
            public_id: "Plantopia/i98989"};
  created_at: "2023-05-05 10:35:44 +0200";
  disabled: False;
  email: "michelle@wh.gov";
  username: "michello";
  password_hash: "lkjliILLkeiol83989hjlkajskhlkjhkuiIIhkjhnhn";
}
But consider the potential size of Michelle’s document, and the future features that you may want to implement in your app. What if Michelle has a collection of 100 plants she wants to catalog? What if additionally she wants to have more data like cuttings taken, fertilisers used, diseases, etc. Most importantly, what if she wants to photograph each or her plants and add progress photos as they grow? You could end up with a document for one user that is hundreds of lines long. The document is still manageable and neither your server nor Mongo would have any difficulty working with such document. But do you really need to see all this information at once when you access each user?
Option 2: Two collections.
You need to consider not only what your client/front-end needs in terms of the data it receives, but also consider how you as the administrator of this data may want to work with it.
I anticipate that I may want to see and work with all the plants that all users have added to the database or work with only the user information (regardless of the plants they own).
In this case I can create two collections, one for users and another for plants. Each user would still has her own plants, but instead of each plant being embedded in their user document, the plants she owns are referenced by a link to separate document in another collection. MongoDB uses each document’s unique _id to reference one document to another. Michelle’s document would then look something like this if it were a JSON document:
1
2
3
4
5
6
7
{
  _id: "644135dfbe2b4049b26a46e3";
  first_name: Michelle;
  last_name: Obama;
  plants: [ "6442743f0179fab0634c27a7", "8992743f0179fab0634c29o12"];
  ... etc.
}
Each plant document can be as extensive as it needs to be, but without adding complexity to its owner. Represented as a MongoDB document (BSON) a single plant could look like this:
1
2
3
4
5
6
7
8
9
10
11
12
13
14
15
16
17
18
19
20
21
22
23
{
  "_id": {
    "$oid": "6453a1416c8fb62f8a1ff430"
  },
  "common_name": null,
  "scientific_name": null,
  "images": [
    {
      "public_id": "PlantTopia/aqjo7chw4jcykygpds0w",
      "uri": "http://res.cloudinary.com/you/image/upload/v1688/PlantUrbanus/aqjo7gpd.jpg"
    },
    {
      "public_id": "PlantTopia/aqjo7chw4jcykygp22s0w",
      "uri": "http://res.cloudinary.com/you/image/upload/v1656/PlantUrbanus/aqjo722pd.jpg"
    }
  ],
  "owner": "michelleo",
  "created_at": {
    "$date": {
      "$numberLong": "1683204508124"
    }
  }
}
So what does line (5) mean?
plants: list[Link[PlantMongoDB]] = []
From left to right, it means a user’s plants is a list of links to the plant document created with the model PlantMongoDB, but by default it is an empty list [].
Obviously, we haven’t created this plant model yet, so no is a good time. Since it is referenced in this model in line (5), you have to import it preemptively at the top too (see line 7):
1
2
3
4
5
6
7
from beanie import Document, Link
from pydantic import BaseModel, EmailStr

from datetime import datetime
from typing import Optional

from models.plant_models import PlantMongoDB
The Beanie Plant Model
In the models folder, add a plant_models.py file and past the following code into it.
1
2
3
4
5
6
7
8
9
10
11
12
13
14
15
16
17
18
19
20
21
22
23
24
25
26
27
28
29
30

from beanie import Document, Link
from pydantic import BaseModel, EmailStr

from datetime import datetime
from typing import Optional

class PlantMongoDB(Document):
    common_name: Optional[str] | None = None
    scientific_name: Optional[str] | None = None
    images: Optional[list] = []
    owner: Optional[str] | None = None
    created_at: Optional[datetime] = datetime.now()

    class Settings:
        name = "Plants"

    class Config:
        schema_extra = {
            "common_name": "Monstera Swiss Cheese",
            "scientific_name": "Monstera deliciosa",
            "images": [
                {
                    "public_id": "Plantopia/fil2q7n6klkky0w1",
                    "uri": "https://res.cloudinary.com/database/image/upload/v1/Plantopia/fixdbpklkky0w1",
                },
            ],
            "date_created": datetime.now(),
        }
Having a plant is optional for each user, so all fields are optional, and all fields have been given the default value of None (null in JSON and BSON) or an empty array (11).
The one salient difference here is the sub class “Config”, which simply is providing a sample of what the object/document would look like with real information.
The Pydantic Classes
The classes we have created establish the relationship with Mongo. But to interact with your front-end, the server uses Pydantic classes, which it uses to validate the data it receives or limit the data it passes to the front end.
In other words two extra classes are needed, an “in” class which is the shape of the information the client/front-end sends to the server, and the “out” class which is the information the server sends to the client side.
To the user_models.py add the following classes under the existing one:
1
2
3
4
5
6
7
8
9
10
11
12
13
14
15
16
17
18
19
20
21
22
23
24
25
26
27
class UserIn(BaseModel):
    """User data requested from the client"""

    email: EmailStr
    username: str
    password: str


class UserOut(BaseModel):
    """User data to the client"""

    first_name: Optional[str]
    last_name: Optional[str]
    plants: Optional[list]
    avatar: Optional[dict]
    email: EmailStr
    username: str


class UserUpdate(BaseModel):
    """User data that can be updated by the client"""

    first_name: Optional[str] | None = None
    last_name: Optional[str] | None = None
    email: Optional[EmailStr] | None = None
    username: Optional[str] | None = None
Notice that our new classes inherit from BaseModel, which is a Pydantic model.
To the plant_models.py file add the following classes:
1
2
3
4
5
6
7
8
9
class PlantIn(BaseModel):
    public_id: str
    uri: str


class PlantOut(BaseModel):
    common_name: Optional[str] | None = None
    scientific_name: Optional[str] | None = None
    images: Optional[list] = []
I will let you create an update class for the plant document.
Connect to MongoDB
You should be aware that MongoDB (the company) calls its database “Atlas”, but I call it MongoDB since it is a much more recognisable brand.
To make a connection you need two things: a config file with the configuration presets and a function to launch this connection each time you start up the server.
At the root level create a config folder and inside it a db.py file and copy the following code into it:
1
2
3
4
5
6
7
8
9
10
11
12
13
14
15
16
17
18
19
20
21
22
import beanie
import motor
import motor.motor_asyncio

from dotenv import dotenv_values
from models.user_models import UserMongoDB
from models.plant_models import PlantMongoDB
"""
Beanie uses a single model to create database documents, so
models have to be imported into the client initialization.
"""

env = dotenv_values(".env")


async def init_db():
    client = motor.motor_asyncio.AsyncIOMotorClient(env["MONGO_URI"])
    await beanie.init_beanie(
        database=client.Plantopia,
        document_models=[UserMongoDB, PlantMongoDB]

    )
What is going on by line number of the db file?
For security purposes, you should not share the access codes to your database, importing dotenv (line 5) allows us to get those access values from a .env file.
Lines 6 and 7 use the Beanie models as a template to create all future documents saved in their respective collections in Mongo. Each instance of a user will be save in a collection called Users and the data will look like the data you describe in the UserMongoDB model. Idem for the plant model.
(13) indicates where the private values have to be “read” from.
(16) creates the function that the main.py file will use to connect to the db every time the server is launched.
(17) creates a motor client using the access URI (MONGO_URI from the .env file), which will connect and interact with the Plantopia database (19), using the UserMongoDB, PlantMongoDB models (20).
The .env file
At the root level of your project, create a .env file with the following code:
MONGO_URI=<here you insert your own string generated by mongo>
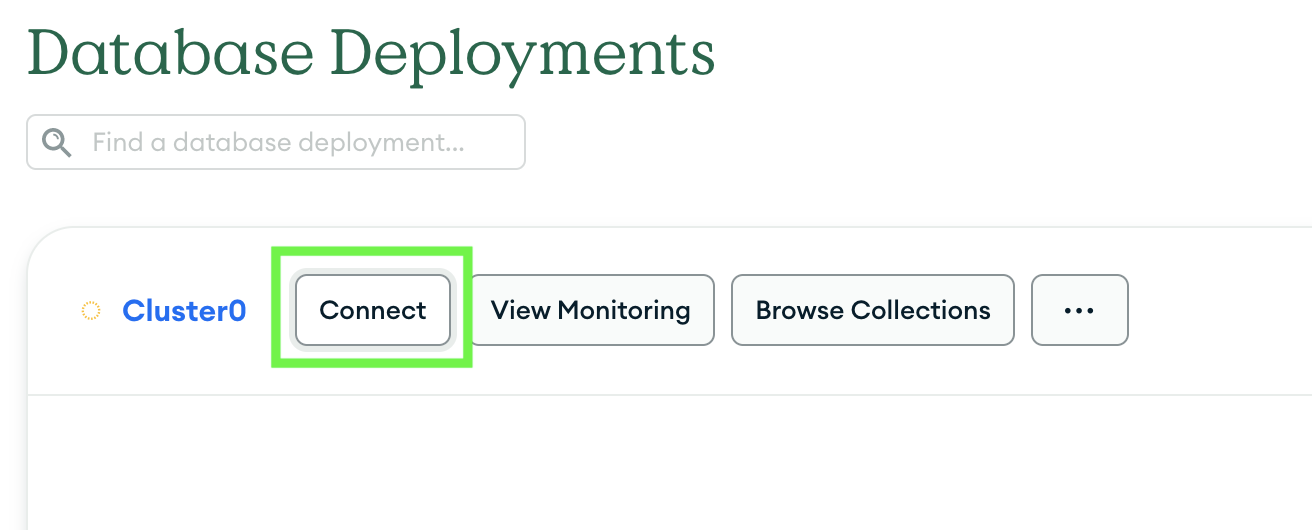
To get your private uri log in to MongoDB an in your project dash board navigate to …

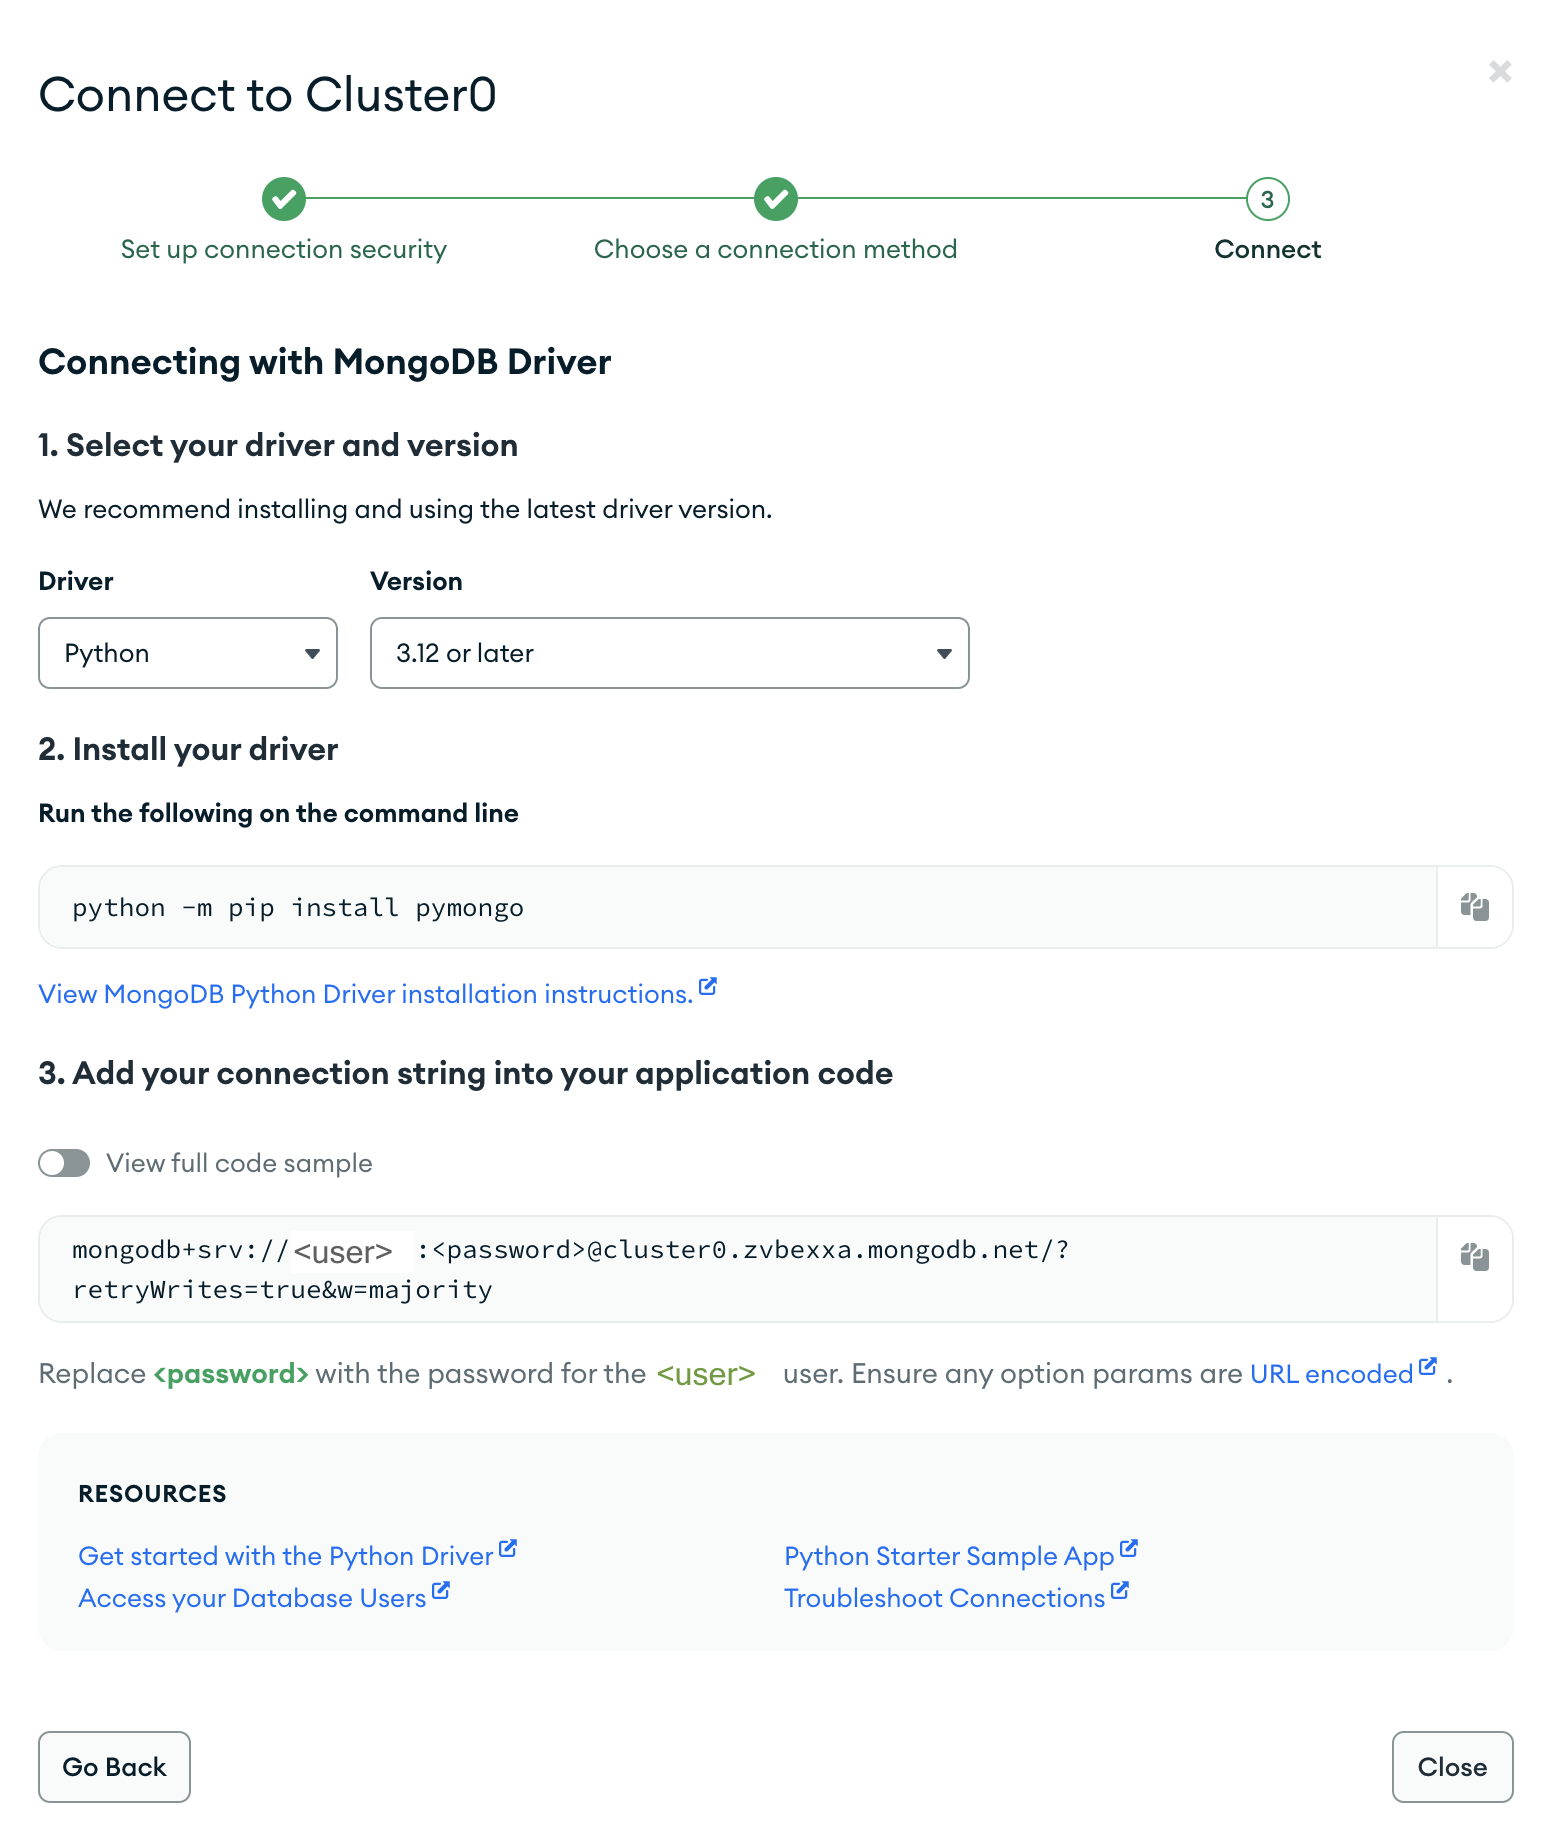
Make sure you replace the values in <> with your own.
Initialising the database connection on server launch
The init_db() function we created above, now needs to be in the main.py file so that it is called every time the server is launched. To achieve this, first import the function at the top of the main.py file as from config.db import init_db, then add this code to the same file anywhere after “app=FastAPI”:
1
2
3
4
@app.on_event("startup")
async def connect():
    await init_db()
Conclusion
At this point you should have a working connection to the database and the models in your server which will help communicate with your database and create User and Plant documents as requested by your front-end.
A relaunch of your server using python3 main.py won’t look any different. You’ll need to start uploading data to Mongo to use the features in the documentation page http://127.0.0.1:8000/docs.
In the next post, I will add the functions or “controllers” which will interact with the MongoDB.